
How to use / For Beginners
This will be the name of the site to be displayed in the site list. It will also be the site name that will be registered when the site is shared through Google search and SNS.
4.2 Notion page URL to be displayed on the top page.
Enter the share URL of the Notion page that has already been set up for public viewing.
Please note that articles in a different workspace from the one set for the top page cannot be published on the same site.
4.45 Top Page Meta Settings
This is the meta information to be set for the top page and for pages with empty information.
The title, description, and OG image previewed when sharing on SNS will be set.
4.5 Footer Settings
Set the footer Notion page to be inserted at the bottom of every page.
4.2 Edit Site Name
4.2 Notion page URL to be displayed on the top page.4.45 Top Page Meta Settings4.5 Footer Settings4.2 Edit Site NameContact us1. account registration2. registration of payment information3. site creation3.1 Site ID Registration3.2 Registration of Notion Pages to be displayed on the top page3.3 Site name setting4. edit site data4.1 Edit Site Name4.2 Notion page URL to be displayed on the top page.4.3 Top page meta settings4.5 Footer Settings4.6 Permalink Settings4.7 Error Page HTML4.8 Advanced Settings5. デザイン編集5.1 ライブプレビュー5.2 サイトアイコン設定5.3 ヘッダー設定5.3.1 パンくずリストの代わりにヘッダーへロゴ画像を表示する5.3.2 ロゴ画像5.3.3 ロゴ・サイト名の遷移先URL5.3.4 ヘッダー右側へのリンク追加5.3.5 検索機能5.4 パンくずリスト(Breadcrumb)についての設定5.5 コンテンツエリア5.5.1 見出しに合わせてセクションを分ける区切る見出しの指定5.5.2 コンテンツ下にSNSシェアボタンを表示する5.5.3 画像のキャプションがURLの場合、画像をリンクにする 5.5.4 タップすると画像を拡大する機能をOFFにする5.5.5 コードブロックを使ったHTML挿入機能をONにする5.6 データベースについての設定5.6.1 データベースの検索機能を非表示にする5.6.2 データベースをURLリンクにする機能をONにする5.7 テーマの設定5.7.1 ダークテーマ5.7.2 テーマCSSの追加5.8 追加CSS編集Contact us
Contact us
Please contact us with your site ID and email address registered with Wraptas ☺️.
If your question is related to a display problem, please let us know the OS and browser version of the device on which you reproduced the problem.
1. account registration
You can choose to register with either a Google Account or an email address.
If you choose the email address login option, you will need to confirm your email address. After registering, you will receive a confirmation email to your email address, which you will need to open and access the confirmation URL before accessing the site again to login with your registered email address.
2. registration of payment information
You can use the service by registering your payment information with Stripe; you will be redirected to the Stripe payment registration page, where you will be asked to register your payment information such as credit card or GooglePay.
After registering, the monthly fee will start at the end of the 30-day trial period. (You will receive an email notification from Stripe at that time, but you will not receive any notification from Wraptas, so please remind yourself).
3. site creation
Once you have registered your payment information, you can create your site.
If you wish to register multiple sites, please refer to the following article.
3.1 Site ID Registration
When registering, please decide on an ID for the site. This cannot be changed later. After entering the ID, check if it is available and if not, you can register.
If the ID is blog, the domain name will be assigned.
Only one ID and one unique domain can be applied to one site.
3.2 Registration of Notion Pages to be displayed on the top page
Enter the URL for Notion to be displayed on the TOP page.
The URL will be the URL that can be issued by turning on "Share to the web" by pressing the Share button in the upper right corner of the article created in Notion (in the upper right menu for smartphone apps).
Please enter the URL as it is shown above.
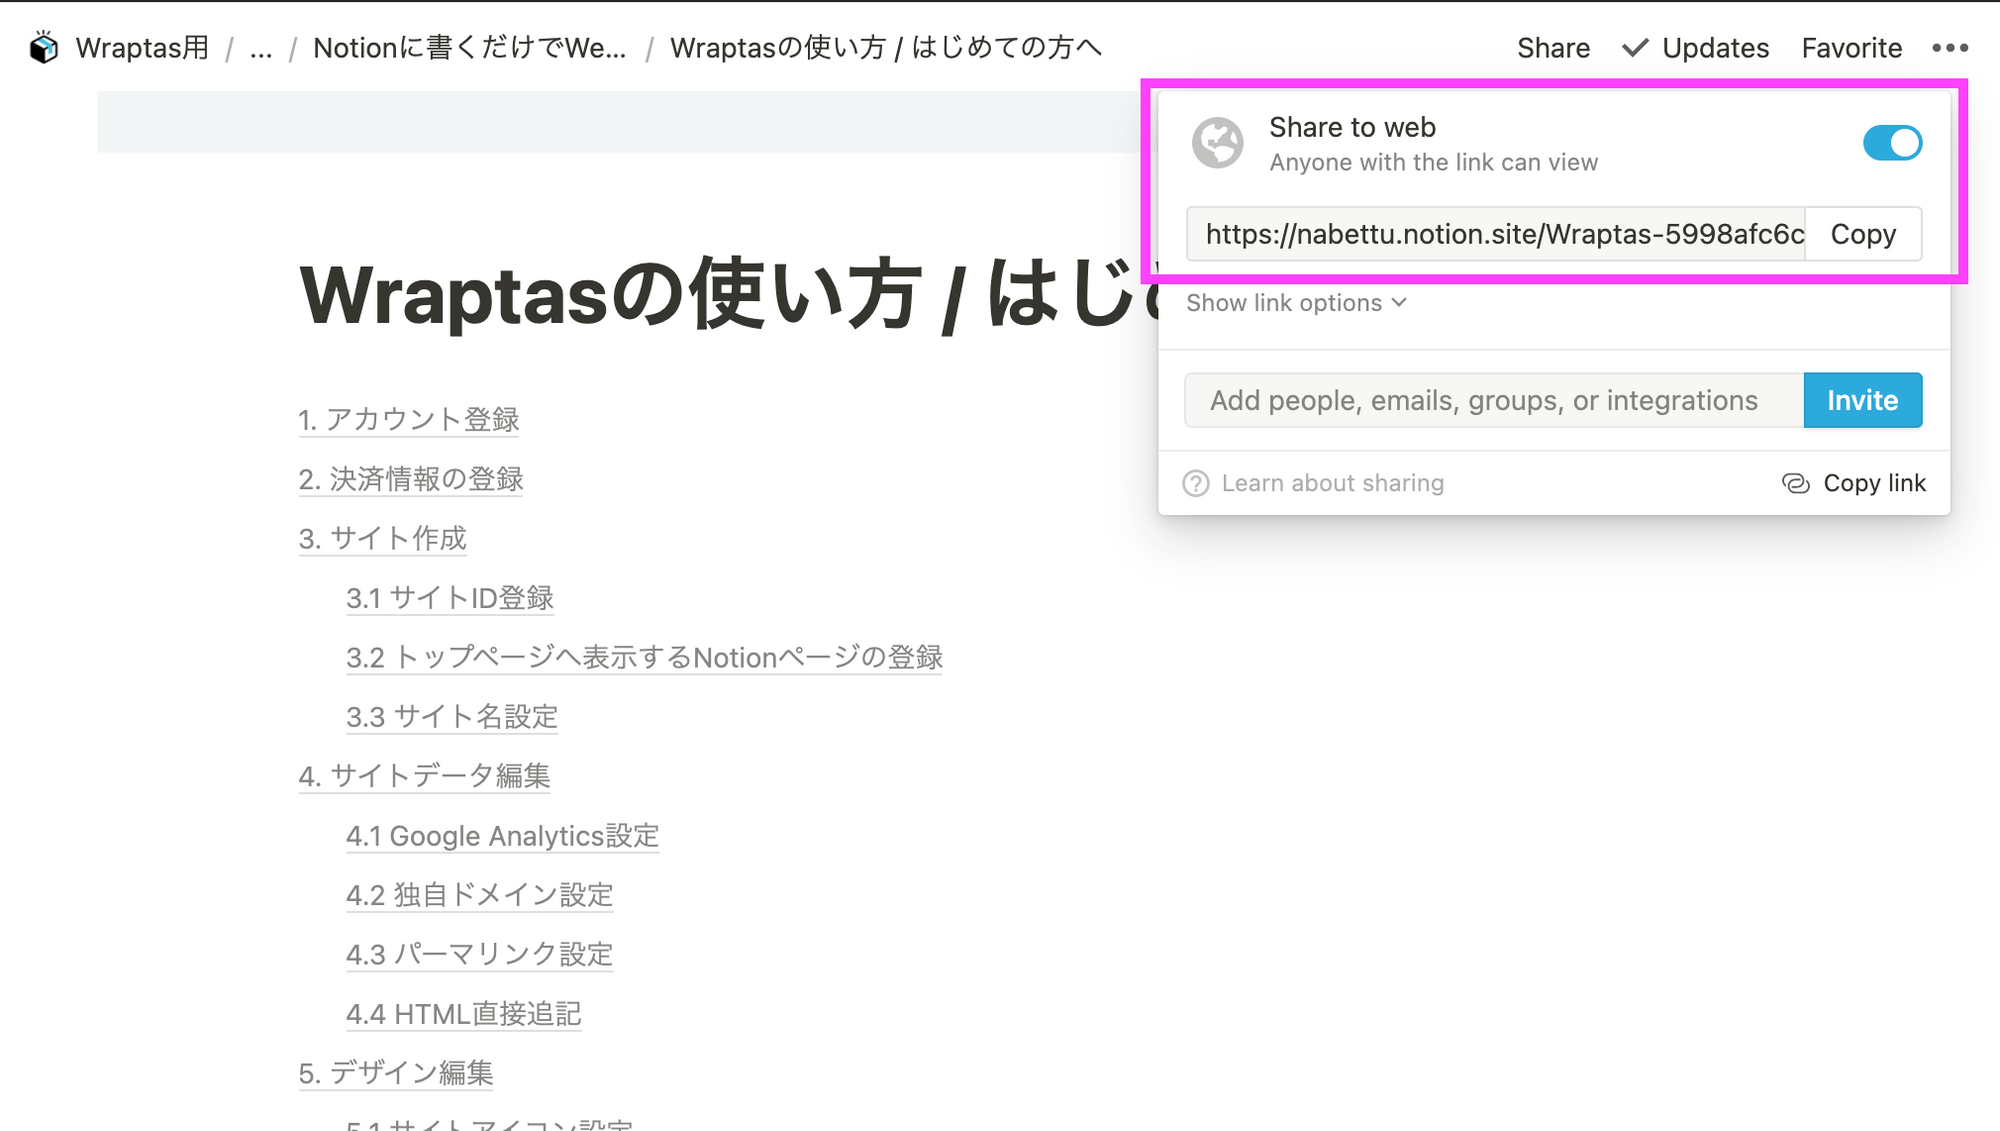
Please note that articles cannot be displayed on Wraptas unless they are in a public state.
After registration is complete, you will be able to access the site using the URL ID.wraptas.site that you have set up.
In the case of a 404 page, the above URL may be incorrect or may not be set to publish. Please check and contact us if you have a 404 page even though neither of these is the problem.
3.3 Site name setting
The name of the site that will be displayed in the header when neither a breadcrumb list nor an image is set in the header. It is also used for the site name when a share button is set.
This is the end of the minimum setup for creating a site, and we will continue to explain additional features such as customizing the look and feel of the site.
4. edit site data
Once a site is created, you will see a list of sites on the dashboard.
From there, click the "Edit Data" button to add site settings.
4.1 Edit Site Name
This will be the name of the site to be displayed in the site list. It will also be the site name that will be registered when the site is shared on Google search, SNS, etc.
4.2 Notion page URL to be displayed on the top page.
Please enter the share URL of the Notion that has already been set up for publication.
Please note that articles in a different workspace from the one set for the TOP page cannot be published on the same site.
4.3 Top page meta settings
This meta information is set for the top page and for pages with empty information.
The title, description, and OG image previewed when sharing on SNS are set.
4.5 Footer Settings
Set the footer Notion page to be inserted at the bottom of every page.
4.6 Permalink Settings
You can specify the articles to be displayed when accessing the set permalink.
When a page with the set ID is accessed, it will redirect to the set permalink.
Example.)
The URL of the Notion page of this manual page can be found here
This page will be displayed with the following URL on the page configured in Wraptas
Add this as a permalink to the link to
(If you access with the original URL, you will be redirected with this URL)
4.7 Error Page HTML
You can customize the page displayed on 404s, etc. The existing site settings, such as CSS, will not be inherited and will be displayed as this html file.
4.8 Advanced Settings
下記の設定を行えます。
- サイトをGoogleなどの検索エンジンに表示されないようにする設定
- ※ON→OFFに変更した場合にはサーチコンソールなどでご自身でIndex登録を行ってください
- wraptas.siteサブドメインから独自ドメインへリダイレクトする設定
- サイト言語(htmlタグのlangに挿入されます)の設定
5. デザイン編集
ダッシュボードで「データ編集」ボタンを押すとサイトのデザインに関する設定が追加出来ます。
5.1 ライブプレビュー
ライブプレビュー確認用の個別URLになります。スマートフォン等でも利用できます。
ボタンを押すとプレビュー用のパラメータが付与されたサイトが別タブで開きますので、そのままこの画面でデザインを編集してください。URLにはプレビュー用の個別のIDが振られていますので、他人にはシェアしないようにお願いします。
5.2 サイトアイコン設定
サイトのFaviconや、ホーム画面に追加する際に利用されるアイコンを設定出来ます。
推奨サイズ 横150px、縦150px
5.3 ヘッダー設定
5.3.1 パンくずリストの代わりにヘッダーへロゴ画像を表示する
こちらをチェックするとパンくずリストの代わりにヘッダーへロゴ画像を表示します(WraptasのサイトではONにしています。)
5.3.2 ロゴ画像
ヘッダーでサイト名の代わりに表示される画像です。 こちらを設定すると5.1で設定した名称は表示されませんがサイト名としてSNSシェア時などに利用されます。
画像を直接アップロードしてください。推奨サイズは横400px,縦50pxです。
5.3.3 ロゴ・サイト名の遷移先URL
ヘッダーのサイト名・サイトロゴをクリックした際に遷移するサイトのURLを設定出来ます。
設定がなければサイトトップへ遷移します。
5.3.4 ヘッダー右側へのリンク追加
Wraptasのサービスページのヘッダーにあるように、リンクを並べて表示できます。
スマートフォンなどの画面サイズが小さい場合には自動でハンバーガーメニューになり、押すとメニュー一覧として表示されます。
5.3.5 検索機能
ヘッダー右端に検索ボタンが追加されます。
検索ではNotionページのタイトルに検索ワードが含まれるもの、またトップページに設定したページ配下のページのみ検索結果に表示されます。
5.4 パンくずリスト(Breadcrumb)についての設定
- 追加でパンくずリストを表示する設定ができます
- タイトル上部
- コンテンツ下部
- パンくずリスト内で、コレクションそのものは飛ばす
- パンくずリスト内で、そのページ自体は非表示にする
- パンくずリストのトップのタイトルを変更する場合のテキストを設定できます
5.5 コンテンツエリア
5.5.1 見出しに合わせてセクションを分ける区切る見出しの指定
見出しに合わせてセクションを分けるWraptasの独自機能を利用できます。
使い方の説明はこちらです
5.5.2 コンテンツ下にSNSシェアボタンを表示する
現在はTwitterボタンのみです。
5.5.3 画像のキャプションがURLの場合、画像をリンクにする
スラッシュ("/")始まりでサイト内リンクになります。
5.5.4 タップすると画像を拡大する機能をOFFにする
5.5.5 コードブロックを使ったHTML挿入機能をONにする
使い方の説明はこちらです
5.6 データベースについての設定
5.6.1 データベースの検索機能を非表示にする
データベース上部の検索機能を非表示にできます。
5.6.2 データベースをURLリンクにする機能をONにする
特定のプロパティにURLを入れていると、データベースページを開くリンクでなく指定したURLを開くリンクに変更できます。
5.7 テーマの設定
5.7.1 ダークテーマ
ダークテーマのカラーで表示します。
5.7.2 テーマCSSの追加
デザインテーマを利用することで、ご自身でカスタマイズの手間無くWebサイトを制作出来ます。
詳細な利用方法は以下になります。Wraptasで利用することを目的にしたNotionのテンプレートも配布しています。
5.8 追加CSS編集
直接追加するCSSを編集出来ます。ライブプレビューや、クラス名一覧機能は準備中です。
こちらはサンプルとしてCSSファイルですが、内容をコピーして入力していただければ同じように適用されます。ご自由にお使いください。
また、そのまま使いたい場合には次の追加CSS欄に直接入力して頂いても大丈夫です。